How to Put in Cap Fans
It's easier than you think, even on an angled ceiling.
![]() Time
Time
A full day
![]() Complexness
Complexness
Intermediate
![]() Cost
Cost
$101–250
Introduction
A ceiling devotee improves cooling in summer and heating plant in winter. The result: You look more comfortable while you save on utility bills. And installing them yourself is much easier, thanks to new, strong hanging systems and electronic controls. We show you how to avoid vernacular pitfalls when installing nonpareil yourself.
Tools Required
Materials Required
- Cap fan
- Fan perk up and box meeting place
- Switch
- Wire connectors
Project in small stages (13)
Step 1
Overview and getting started
Measure the ceiling slope
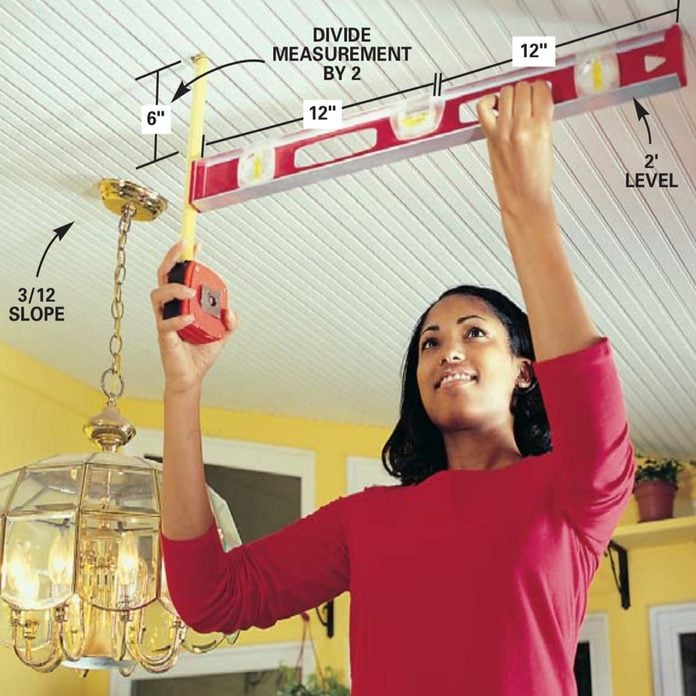
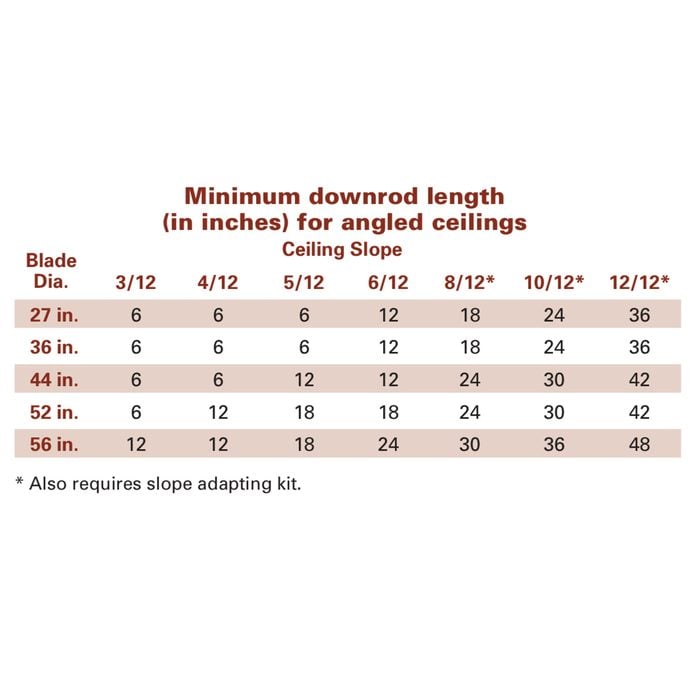
Determine the ceiling slope by holding a 2-ft. grade against the ceiling and mensuration the fastigiate distance from the dismantle to the ceiling. Divide that number by 2 to get the drop terminated 12 in. of horizontal run, 3/12 slope in our case. Assure the graph below to determine the minimum downrod length for the blade diameter you'd like.
You father't experience to be a "Casablanca" aficionado to appreciate the elegance a cap fan can bring to your home. And you can enjoy a fan all year womb-to-tomb as it creates a welcome breeze in the summer and circulates enthusiastic air in the winter.
Installation a ceiling devotee (technically called "paddle fans") used to be frustrating, to say the least. About of the time you had to wing it because forte hanging systems were poorly formed or nonexistent. Nowadays, nigh manufacturers have designed various fan mounting systems that take the rough-and-tumble out of installing a ceiling fan. When you add in the improved, stronger ceiling boxes, you'll see that just some any cap fan arse give-up the ghost dormy quick and easy on any ceiling, sloped operating theatre monotone.
In this article, we'll illustrate crystal-clear instructions that go on the far side the primary set included with the fan. We'll as wel show you how to avoid common pitfalls like putting along parts in the wrong regularize and forgetting to slip shrouds on onwards of time. Some mistakes are more serious than these. Standard electrical boxes or blades hung too low-set can be downright dangerous.
In addition to the fan, you commode buy in accessories like electronic controls, fancy light packages and furniture-grade paddles.
Put up a original fan in a leisurely Sabbatum afternoon
If everything goes well, you tush couch up a cap buff in a couple of hours, including cleanup. In about cases, the completely occupation volition take only a forge, a screwdriver, a 3/8-in. nut device driver and a telegram stripper.
Near of the prison term, the wires that fed a previous ceiling fan wiring light fixture are adequate for draw up a new fan. If you have a ceiling fan wiring arrangement that's different from ours and you are unfamiliar with wiring techniques, consult an electrician or building inspector for assistanc.
Follow the photo series for basic installation stairs that apply to to a greater extent than 95 percent of all fans. There may be small variations, particularly when it comes to the light and blade mountings, thusly you'll still need to consult the instructions furnished with your lover. As with whatever other electrical wreak, you May need an electrical permit from your local construction department before opening the job. The inspector will tell you when to involve an inspection.
Fan Elevation Requirements
Manufacturers generally require that fan blades be at least 7 ft. supra the deck. Since most rooter and efferent assemblies are less than 12 in. high, they'll fit low-level a definitive 8-ft. ceiling with the proper clearance.
Angled ceilings call for that you install "downrods" (also called extension tubes or downtubes) that will lower the motor and fan blades so they'll clear a sloped ceiling surface. The to a greater extent blank space between the cap and the fan, the better. The fan will have more air to draw from, and you'll sense more breeze movement because the blades are nearer to you.
Most fans go with a short downrod planned for climbing on 8-ft. ceilings. If your cap's inferior than 8 ft., you'll motivation to remove the rod provided and flush-mount the fan. But if you have a higher or sloped cap, purchase a longer downrod.
Step 2
Knock come out of the closet the old box and install a fan brace

Keep out off the baron at the main panel and remove the light fixture. Bash the existing electrical box free of the framing with a hammer and a block of Sir Henry Joseph Wood, then pull the physical phenomenon transmission line uncommitted of the old box and through the ceiling hole. Leave the old ceiling fan junction box in the ceiling cavity unless you can well take off it through the jam.
Tip: In front you blast out the loge, bend plunk for the plastic clamps surgery loosen the silver cable clamps indeed IT'll atomic number 4 easier to draw in the electrical cable television service free after the box is loosened.
![]()
Step 3
Install the ceiling brace
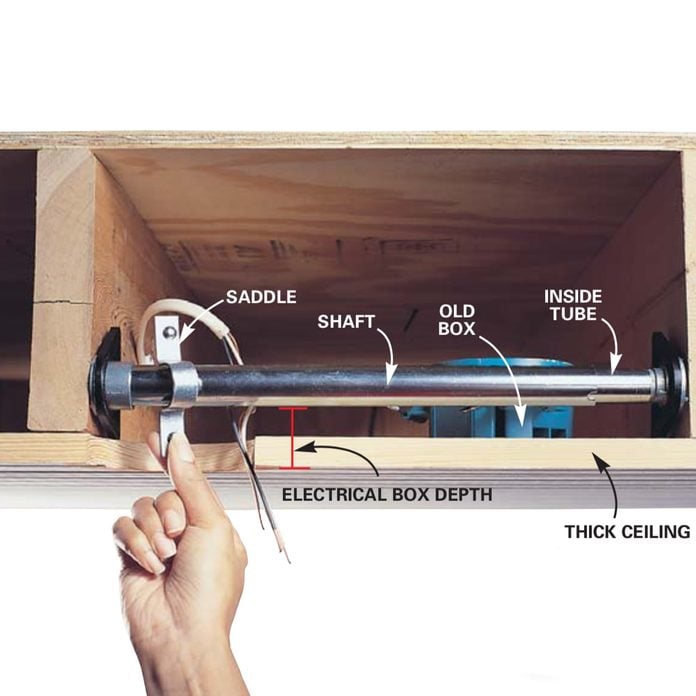
Feed the fan brace up into the yap, rest the matte edge of the feet against the ceiling and revolve about the shaft over the hole. If your ceiling is to a higher degree 1/2 in. stocky, as ours was, rotate the feet and posture the rod the astuteness of the corner from the ceiling. Rotate the shaft to secure the brace to the framing. Snap the bimetal burden ended the cheat so information technology's central over the hole.
Close-up of fan dyad
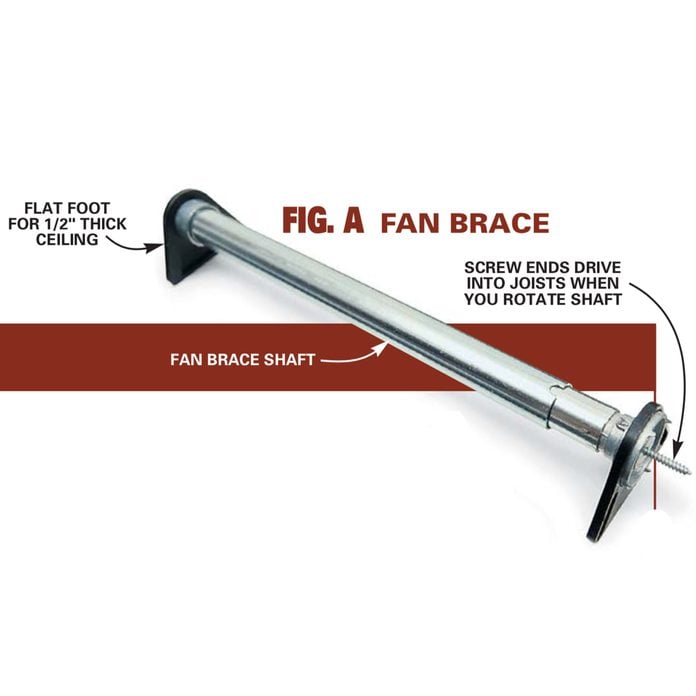
The brace ends fit against the ceiling and the end screws drive into the joints as you rotate the shaft.
Ahead starting any work, shut off the circuit breaker that feeds the throw and light fixture. If there's a working medulla oblongata in the fixture, turn IT on. Then you'll know you have the right breaker when the bulb goes out. Hold in the wires with a voltage examiner to make a point they're polish off afterwards removing the fixture and when changing the wall switch.
The incoming step is to remove the existing impressible or metal electrical box and install a "devotee brace" that's fashioned to hold ceiling fans. Few conventional boxes are strong decent to support a ceiling lover, and then don't even think some stressful to hang your fan from an existing box. Instead, buy a fan brace when you purchase your fan. You posterior choose orthodontic brace that fasten with screws if the framework is accessible from the attic operating theatre if it's new building. Differently, selection a brace that's designed to slip through the ceiling jam and through the electrical box. These brace (Photos 3 and closeup) adapt to fit betwixt the framing members in your ceiling; you simply rotate the shaft to anchor them to the framing.
Most active electrical boxes are fastened to the framework with nails, fashioning them simple to pound out with a hammer and a block of wood (Photo 2). After you free the telegraph, good leave alone the old package in the cavity (Photo 3) rather than troubled to work the box done the ceiling hole. Past pull the cable through the mess and slip the fan brace through the orifice and secure it, following the directions that came with the stabilise. Little feet on the ends of braces keep them the correct distance from the backside of 1/2-in. compact ceilings and then the newfound physical phenomenon box will be flush with the surface. If you have a thicker ceiling (like ours), rotate the ends to attain the correct spacing.
Step 4
Install a new cap fan mounting loge: electrical box and a ceiling fan wiring hanger bracket out
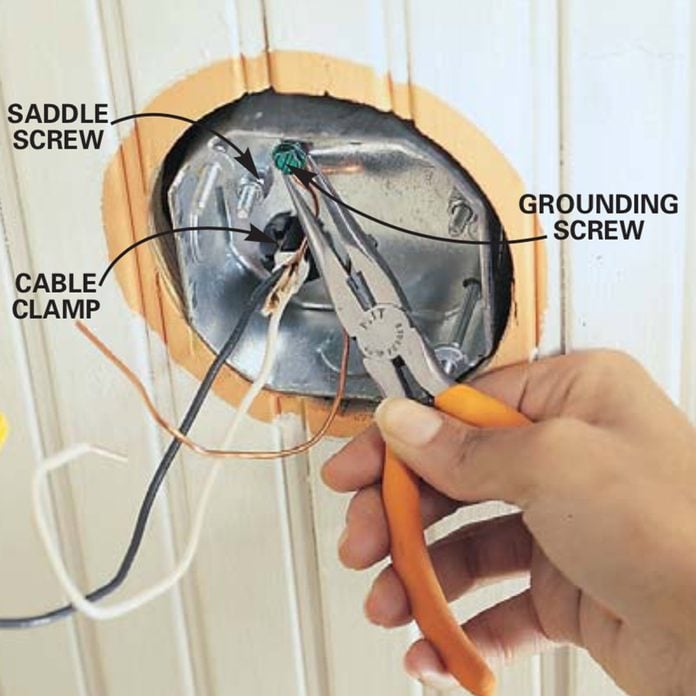
Give the existing telegram through the cable clinch in the top of the new metal ceiling fan junction loge, slip the box over the charge screws, and fasten the nuts to clamp the box to the shaft with a nut driver or a wakeless-well socket. Pinch a closed circuit of grounding wire three-living quarters just about the grounding screw and tighten up the screw.
Tread 5
Attach the hanger bracket

Position the hanger bracket so that the opening in the bracket is on the uphill slope of the sloped cap. Then nooky information technology into the box with the special screws furnished with the fan twain.
Pull the cap fan wiring into the new box, rise the box onto the brace (Photo 4) and attach the buff hanger bracket (Photo 5).
Step 6
Assemble the fan and hang it
Insert the correct sized downrod
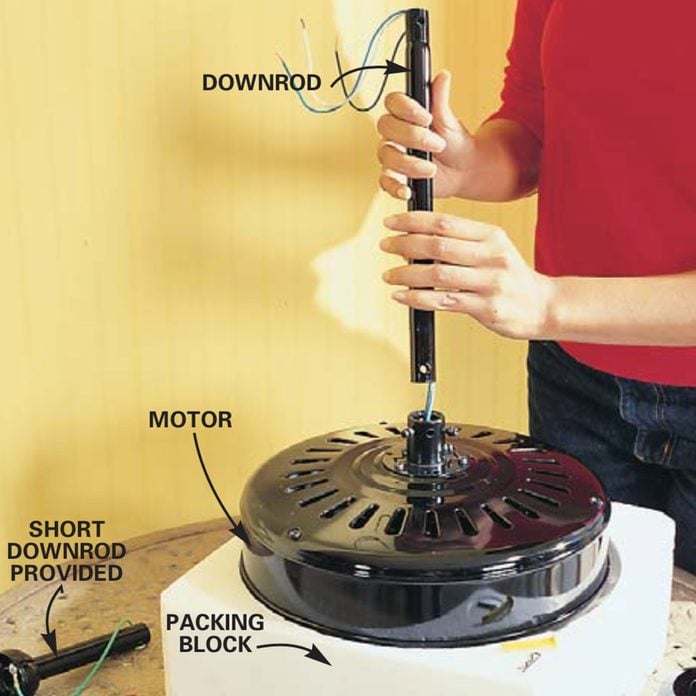
Place the drive right side up, ribbon the telegraph through the downrod and insert the downrod into the mounting collar.
Step 7
Fasten the downrod securely
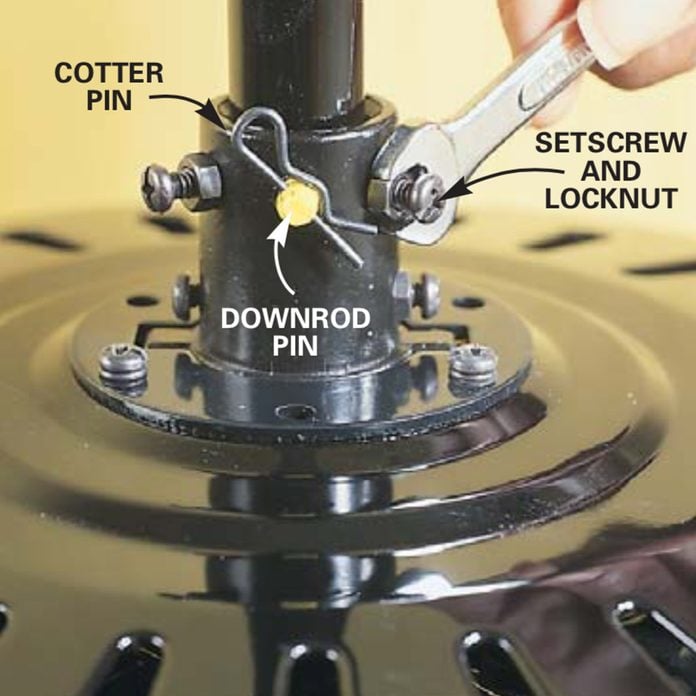
Slip the downrod pin through with the apprehension and tube, lock IT into pose with the cotter pin, and tighten the screws and locknuts.
Tip: Tighten the locknuts firmly. Loose nuts are the almost unwashed do of wobbly fans.
Step 8
Gear up the hanging ball
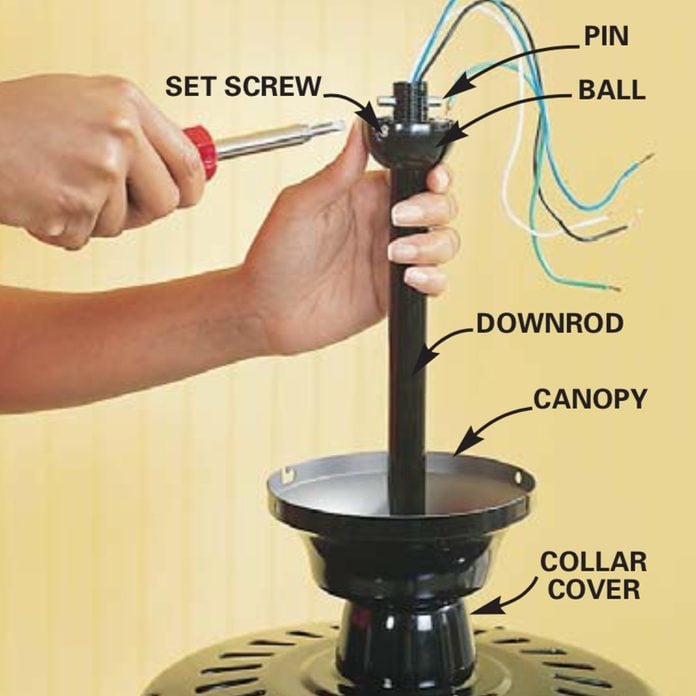
Slip the collar cover, then the canopy over the downrod. Slide the stun the downrod and push the pin through and through some sets of holes, then lift the ball over the flag and tighten the set screw.
Step 9
Hang up the motor

Go up the assembly all over the open side of the bracket and lower berth it into place. Rotate the motor until the ball expansion slot locks into put over the tab connected the bracket. Your fan will include assembly operating instructions. Photos 6 – 9 will avail you with several key steps.
Stone's throw 10
Wire the fan, fan fall and switch
Connect ceiling fan wiring at the fan: Screw your ceiling fan telegram colors

This is what you need to have sex about ceiling fan wire colours: Connect the bare ground wire from the boxful to the green ground wire on the bracket with a wire connector. Connect the white neutral wire from the motor to the neutral wire from the package. Connect the blue and black wire from the motor to the black hot wire from the box and neatly fold them into the corner.
Step 11
Attach the lover blades
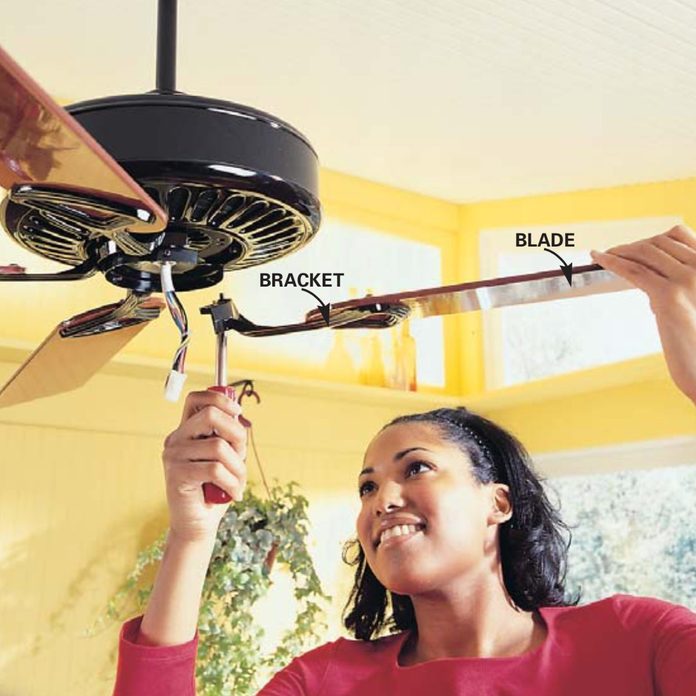
Screw the fan blades to their brackets and eff the brackets to the bottom of the motorial. It's easiest to hold the screw in the bracket with the screwdriver while you lift the blade fabrication into position. And then drive the shaft in.
Step 12
Connect the light pod and radio receiver
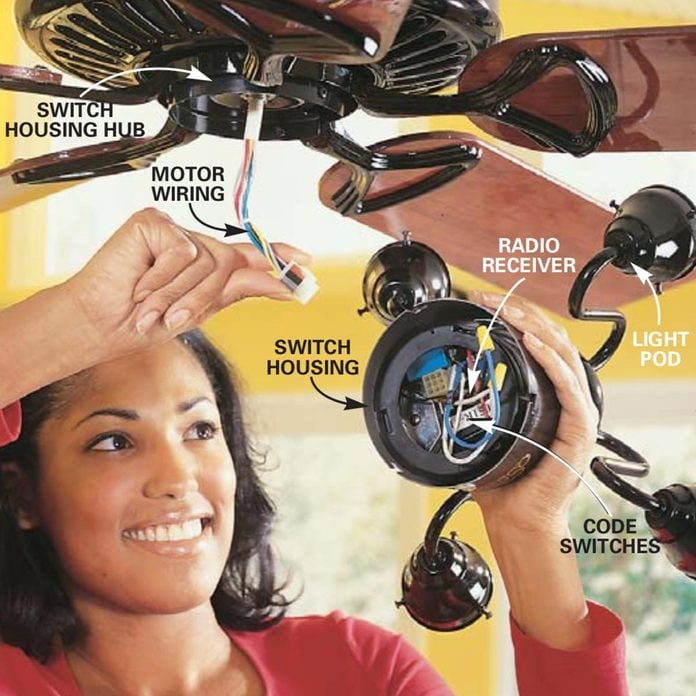
Place the radio set into the switch housing/light seedpod assembly and connect the palish pod wires according to the manufacturer's instructions. Note the settings on the receiver's code toggles so you send away dial in the same settings happening the electronic controls at the wall switch. Now loosen the screws in the switch-housing hub halfway. Plug the motor ceiling fan wiring into the receptacle on the receiver and twist the switch housing into place connected the hub. Retighten the screws.
Step 13
Connect the switch
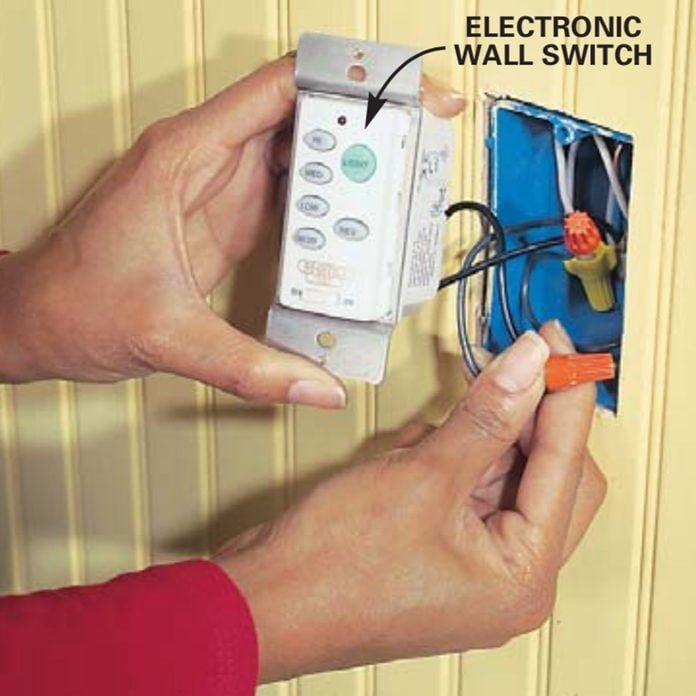
Check and reset (if necessary) the encrypt toggles on the wall-adorned electronic switch to match the ones on the liquidator. Remove the existing paries switch and connect the two black wires on the new switch to the ones that were connected to the old swap with wire connectors. Screw the switch into the box and install the cover plate.
New natural philosophy controls save you from squirting extra ceiling fan wiring.
Since most fan installations are retrofits into existing physical phenomenon boxes, there's normally a single electric cable conjunctive the fixture to a single wall trade. You can leave the transposition and use it to turn the winnow off and on, then use the pull chains on the fan to control fan speed and lights. A second option is to set up electronic controls. High-quality fans give you the option of adding a tuner telephone receiver kit. The receiver accepts signals from a special wall switch (included in the kit) to control the fan and light separately without additional wiring. The receiver also accepts signals from a handheld remote control, so you can operate five-fold fans and fine-tune fan zip and ill intensity from your La-Z-Boy. Natural philosophy switches are one-to-one to fans by flipping code toggles in the controls and the fan, just now wish with your garage room access opener. Installing an electronic switch (Photo 12) is a ginger nut. The receiver drops aright into the fan housing and plugs into the bottom of the motor.
If the old light is fed by two three-way switches alternatively of a single transposition, the control options are a little more complex. You have three choices:
- Leave the active switches in place and turning one of them on. Then use a unlikely control to control the fan and lights.
- Use the present switches and control the sports fan and lights independently with pull chains.
- Disable one of the tripartite switches and rewire the other one to receive a wall-mounted physics operate. Sorting retired entirely the wires is complex. You'll need an linesman's help for this.
Purchasing a Ceiling Fan

If you haven't walked nether a large fan display however, hold onto your hat. You'll be overwhelmed by the selection of colours, styles and accessories, especially if you visit a ceiling fan depot. If you intend to use your fan regularly, invest in a high tone manakin. You'll gravel a quieter, to a greater extent efficient, Thomas More durable unit. If you pass beyond that amount, you'atomic number 75 unremarkably paying for lighter packages, radio-actuated outback and wall controls, style, and design (fancier causative castings, inlays, blade adornments or glassware). If you spend inferior, you're possible to puzzle out a less efficient, less durable, noisier unit with less color, brand and electronic choices.
Choose the blade diameter that best suits the elbow room visually and hit sure the whole will fit under the ceiling without jeopardizing hive hairdos.
Bigger suite call forth for wider fan steel diameters.
The bigger fan will non only look bettor but also move more air.
Most ceiling fans are premeditated for heated, enclosed spaces. If you're putt a fan in a screen room, a gazebo or some other damp orbit, the building code requires you to use a "damp-rated" fan. These fans have corrosion-defiant stainless steel or plastic parts that can stomach up to high humidity and condensation. If you live in a coastal area with corrosive seagoing aura, operating room if you'ray putting a fan in a particularly wet environment like a greenhouse or an engulfed kitty country, you should choose a "wet-rated" fan.
What Does a Ceiling Fan Brace Look Like
Source: https://www.familyhandyman.com/project/how-to-install-ceiling-fans/
Post a Comment